Saturday, April 21, 2012

I Changed Blog Name

I decided to change my blog name to:

'Lola's Mini Homes' 

Lola is my niece (God-daughter) and my favourite person
and the reason why I started making these dollhouses.

Now she's getting older and doesn't play with them as much but
still likes making movies using the homes and posting them on YouTube.

And now I have realized my passion for creating mini modern homes, furniture and accessories, so I don't want to stop and receiving 
comments from 'you' inspires me to keep going. So thank you for helping me realize my passion, and a big thank you to you Lola!
Love you lots! Hopefully this will be the start of your Realestate Empire.
She's only 10 I know but if I knew at that age 
what I know now...

CREATE & PLAY
So this blog will be about sharing how to make these homes 
and accessories using cardboard, paper mache, items from dollar stores, thrift shops and garage sales or stuff you find around your home making it inexpensive...cheap, so anyone can make it. 

Spend time with your young ones creating and playing. We're never too old to pick up a doll and play, isn't it almost like those computer games, like 'Sims' or similar, but only in 3D and I think more fun! So lets get kids back to real toys, not staring into a screen, and using their imagination and creativity.

Thank you for visiting

become a member and never miss a post...


Sunday, April 15, 2012

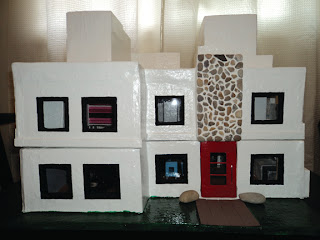
New Dollhouse update...tour

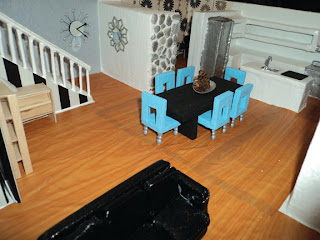
Almost finished with this Polly Pocket house for my niece, she wants to do more movies once I'm finished...me too.. There's still alot of detail left to do. Not sure what to do with the kitchen and the bathroom... if anyone has any ideas please send me your tips and decorating ideas...


Still need to add a garden


Not sure what to do with kitchen, do you have any ideas? please send them to me...
I know the fridge looks bad, I would love to just rip it out and start again but that will cause a big mess... I am really not happy with it... Hopefully painting it more carefully will make a difference.


The George Nelson Ball Clock, check out the tutorial on an earlier post...
The mirror was a great find, I found the back of the mirror at Value Village and glued a little mirror I got from a dollar store...but maybe it should be hung on the middle of the wall... I'll fix that later...


The cabinet was a first try and it doesn't open too easily, but I still like it, not sure what colour to paint it...again send me your thoughts...


I love how the office is looking, still needs a little more detail, the George Nelson Marshmallow Sofa looks great...it is fragile but it was meant for this area which will not really be used...
Wallpaper is gift wrap from dollar store...you gotta love the dollar store...


Urgh....the fridge...I cringe whenever I look at it...


 The floor is not looking its best, I could have been more carefull laying down the shelf paper, oh well, maybe I'll make some rugs so it won't be so obvious...


That wall needs something... I am making a tv to hang on wall, I want to magnetize it so I can print out some of my nieces favourite movie scenes...right now its Hunger Games and Harry Potter....so that way she can have a few movie scenes to play with....


Behind that shelf is a removable wall...doesn't look like it there but it's a bit too big, will fix that later too...
Under the stairs is a huge storage area...


The teens room...needs a new closet, can't really put anything in there, have to come up with a better idea, or make the opening smaller and split the door in two.... I want to do all the big projects now and then go back and add more detail to it... I guess I want to make it livable for the Polly's.... I'm not crazy... I know they're not real....sometimes I wish they were....again I'm not crazy....


This will be the boys room, I want to make space in here for a baby crib...my niece likes to have a baby in some of her play scenes... I will be making a crib and adding post here...

The master bedroom, Its kind of small, when my niece plays, her main characters are the children and the parents are just off somewhere doing whatever....


The other girls room... closet works...yeah... my niece wants me to add 2 beds to this bedroom...
and she doesn't want bunk beds....


Ok thats it for now, thanks for visiting, please tell me what you think. I love hearing from you, it motivates me to finish this house more quickly.

Check out our YouTube channel for our videos:
gingerlola2011

HAVE A GREAT WEEK!

How to Make Dollhouse Front Door

Hi, how is everyone...thank you for stopping by and checking out my dollhouses. I'm back at working on this Bigger Polly Pocket house...still have quite a bit to go, all the details...the most important part...

Below is my tutorial for the front door...had some mishaps, I should really spend more time on measuring and cutting it right. 


Materials Needed:
Cardboard
Popsicle Sticks
Craft Sticks
Coffee Stir Sticks
Skewers
Clear Plastic - for window
Wire


Before I finished adding all the craft sticks, I measured it against the dollhouse opening and dag nammit...
it didn't fit and was way off...


So instead of starting over with a new piece of cardboard, I decided to just rip off the sticks...
one reason...I didn't have many popsicle sticks left, not enough to make another door, and the craft sticks were too thick...so I ripped off the sticks...not too carefully - because it was already pretty late.... cut down the sticks a bit so it would fit and started again...


Now start painting your door


I didn't take any more pictures...sorry.
I made 2 holes in the dollhouse wall to feed the wire through and I haven't glued it down yet... 
I have to fix the wall since I sliced a bit of it off to fit the door in...I rather fix the wall with paper mache and paint instead of starting the door over again. I also glued a piece of clear plastic to the door to mimic a window.


Thanks for visiting. Please subscribe.

Check out my YouTube channel for all my videos
gingerlola2011

HAVE A GREAT WEEK!


Saturday, April 14, 2012

How To Make Miniature Version of George Nelson's Ball Clock

Hi, thank you for visiting my blog, this weekend I made a miniature version of George Nelson's Ball Clock, I love his designs. I also made the Marshmallow Sofa on an earlier post.
Check out my YouTube videos for both how to's...

GEORGE NELSON
With the diversity of materials used and their sculptural shapes, George Nelson clocks embody the joie de vivre of the 1950s. To this day, his wall clocks, including the George Nelson Ball Clock, remain a refreshing alternative to the usual timekeepers. The white ball clock is a fun, contemporary touch to any interior.This design was highly successful both as a popular consumer product and icon of high design.


My Miniature Version of George Nelson's Ball Clock


Materials Needed:
- beads, I used white but you can you any colour or even use more than one colour beads.
- little mirrors, I used little mirrors as my face but you can use anything thats round and small.
- match sticks, I used match sticks and painted them silver, I wish now I left it natural because its
  hard to see against the grey wall, you can also use wire...  if I were to make this again, I would 
  probably use needles.
- black cover stock, I used an old notebook cover.
- silver paint, for the matchsticks, urgh should have left it natural...maybe I'll make another one.

First...paint the match sticks silver...urgh why did I not skip this step...maybe once the rest of the house is done, I will go back and fix things up and paint the sticks white or even black???

Once sticks are painted and dried, cut them down to fit the clock face (mirrors). I also marked
the mirror in freehand...should have used a ruler...again...next time I'll get it perfect... I also drew a bigger circle around mirror so the sticks will be all similar in size around the clock face (mirror)....


Once all the sticks are glued to the back, glue the other mirror to the back of the front...does that make sense....I'm sure you know what I mean...

Now glue the beads to the end of the match stick.

Grab your card stock and make the clock hands...

And now you're done...its not perfect but it'll do for now...


Thank you for watching...tell me what you think or make your version of the Ball Clock and post it here!
before
after


Sunday, April 1, 2012

How to Make a Dollhouse Office Chair


I also made the desk lamp, laptop and flowers.

Materials needed: 
wooden stir sticks for feet
round beads for wheels
material - I used an old purse
cardboard


oh I forgot to mention the Ikea whatchamacallit...


Thank you for stopping by....next week I think I will probably work on the front door and maybe do the rest of the wallpapering...